Last week we tested out our new addition to our menu, soda bread. After looking at several recipes, we opted for Rachel Allen's Irish Soda Bread featured in a Blackbird Bread favourite, 'Bake' and, with the exception of a couple of things, (see below), it's the one for us! You can find it at http://www.rachelallen.co.uk/recipes_april09.html
We'd actually had a go at a soda bread a few months before using Daniel Stevens recipe from the 'River Cottage Bread Book' and used soured milk. To be honest, it was like a heavy, doughy, bland scone. And I think this is where the buttermilk comes into play. The interaction between the acidity of the buttermilk and the bicarbonate of soda really lifts the dough, and creates a light, crumbly but moist bread.
Rachel Allen's recipe is incredibly simple, however, the thing to consider is the amount of buttermilk. You need lots of it too! But the recipe is a little vague on the exact quantity of buttermilk (350-425 ml). So initially, and because we only had one pot of buttermilk, we used 300ml of buttermilk and topped it up with 50ml of milk.
We did a deep cut into it, which was very easy to do and it baked retaining the cut. But, I don't think this is quite right. It's split almost completely open which differs to the photo in Rachel's book.
We tested this loaf on some of our customers. While some people loved the taste, others said it lacked the distinct soda bread hit!
So we tried again, adding a pinch more salt, a quarter of a teaspoon more of bicarbonate of soda and, most importantly, far more buttermilk - 400ml. We were concerned that too much buttermilk and the dough would become too wet and unworkable. We were right, straightaway the dough was far more soggy and difficult to cut a deep cross into (we needed to keep wetting my knife just to get it through the dough!). But we think this is the nature of this type of bread, and dealing with the wetness of the dough is worth the result.
It came out like this.
The dough has risen and almost sealed the cross, which is exactly as I had seen in various books.
Taste-wise, it was a hit with all out testers and is now a new feature on our bread menu.
Sunday, 22 July 2012
Wednesday, 4 July 2012
Fit for a queen!
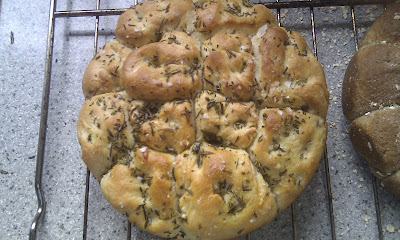
As part of the Jubilee celebrations, I thought I'd invent something fit for a queen! Blackbird Bread has a devoted following for our focaccias, which owes almost everything to Dan Stevens recipe. (The difference in our recipe is using a tiny bit more yeast and by making fresh rosemary oil which really perks things up!) I thought a combination of focaccia and a traditional bread crown would be an interesting experiment. It went down very well and is currently our bread of the month!
It's a very simple recipe (hey! what else from me!) but looks and tastes great. Instead of the traditional flat bread, this one is formed into 12 small rolls, which can be torn off, dipped into oil or used to accompany any dish! This recipe owes as much to Mary Berry as Dan Stevens - the basis of the crown recipe can be found in her amazing Baking Bible book.
See our entry on 9th March 2012 http://blackbirdbread.blogspot.co.uk/2012/03/for-foccacias-sake.html for ingredients. The only difference is as follows:
Replace 500g strong white flour with 350g strong white flour. Using the olive oil, pour into a small jug and add several sprigs of fresh rosemary (we usually keep a few sprigs of rosemary in the freezer) to make rosemary oil.
 |
| Rosemary oil - love the little jug! |
Follow the recipe highlighted above, until the dough has doubled in size and is removed from the bowl.
Turn on the oven to 200C. Grease a 20cm round tin and place upon a larger roasting tray. This stops any oil from leaking onto your oven.
When the dough is tipped out of the bowl (after first prove), instead of placing onto a tray, divide the dough into 12 (almost) equal size pieces. Don't worry if they don't look exactly the same size, it's going to look incredible anyway! Roll each piece into a ball and place gently in the tin, so that eight pieces are on the outside and four in the middle
Cover with a clean cloth, or clingfilm and leave to rise for 30 minutes.
Using your fingers, lightly prod each piece, then pour over the remaining rosemary oil, the sea salt and the chopped up rosemary sprigs (see recipe highlighted above for those ingredients).
Place into the oven for 20 mins. I check ours every 5 mins. No, I'm not OCD, I just know my oven, which cooks quicker on one side than the other, so every 5 mins I turn the tray around.
At 20 mins (or a bit more if needed) this is what you have!
It now needs at least 5 mins, but not much more, to cool, then remove from tin and place carefully on a wire rack. Tuck in when the smell gets too much for ya!
Subscribe to:
Comments (Atom)


